안녕하세요?
지난 포스트에서는 model을 이용하여 블로그 포스트(Article)을 작성하였고,
이를 메인 화면에 뿌려줬습니다.
하지만 메인화면에서 포스트를 클릭했을 때, 자세히 보는 화면에 연결이 안되었는데요,
오늘은 이 부분을 작업해보겠습니다.
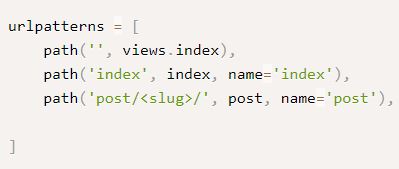
urls.py 파일 수정
먼저, blog 폴더 밑에 있는 urls.py 파일에 아래와 같이 post 관련 부분을 추가합니다.
urlpatterns = [
    path('', views.index),
    path('index', index, name='index'),
    path('post/<slug>/', post, name='post'),

]
그리고 TestProject 밑에 있는 urls.py 파일에는 헷갈리지 않도록 post 부분을 지워줍니다.
#TestProject/urls.py

from django.contrib import admin
from django.urls import path
from django.conf import settings
from django.conf.urls.static import static
from .views import *


urlpatterns = [
    path('', views.index),
    path('index', index, name='index'),
    path('about', about, name='about'),
    path('contact', contact, name='contact'),
    path('admin/', admin.site.urls),

]

if settings.DEBUG:
    urlpatterns += static(settings.MEDIA_URL,
                          document_root=settings.MEDIA_ROOT)
    urlpatterns += static(settings.STATIC_URL, document_root=settings.STATIC_ROOT)
views.py 파일 수정
blog 폴더 밑에 views.py 파일에 아래와 같은 함수를 추가합니다.
def post(request, slug):
    article = Article.objects.get(article_slug=slug)
    return render(request, 'post.html', {'article':article})
여기서 slug 변수는 urls.py 에서 보내주는 파라미터로, 각 Article의 요약된 제목같은 정보입니다.
Article.objects.get(article_slug=slug) 부분은 slug 변수에 해당하는 article 을 가져오는 부분입니다.
post.html 파일 수정
post.html 파일을 열고 <head> 태그 사이에 아래와 같이 title 지정을 위한 부분을 추가합니다.
<head>
    <title>{{article.title}}</title>
</head>
아래와 같이 <body> 태그의 <!-- Page Header-->주석 아래를 수정해줍니다.
<!-- Page Header-->
        <header class="masthead" style="background-image: url('assets/img/post-bg.jpg')">
            <div class="container position-relative px-4 px-lg-5">
                <div class="row gx-4 gx-lg-5 justify-content-center">
                    <div class="col-md-10 col-lg-8 col-xl-7">
                        <div class="post-heading">
                            <h1>{{article.title}}</h1>
                            <h2 class="subheading">{{article.subtitle}}</h2>
                            <span class="meta">
                                Posted by
                                <a href="#!">Sanlab</a>
                                {{article.published}}
                            </span>
                        </div>
                    </div>
                </div>
            </div>
        </header>
        <!-- Post Content-->
        <article class="mb-4">
            <div class="container px-4 px-lg-5">
                <div class="row gx-4 gx-lg-5 justify-content-center">
                    <div class="col-md-10 col-lg-8 col-xl-7">
                        {{article.content}}
                    </div>
                </div>
            </div>
        </article>
        <!-- Footer-->
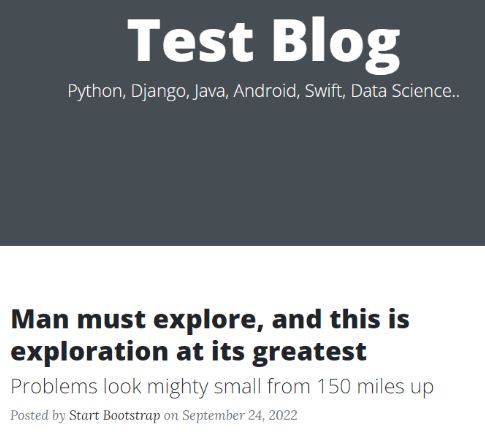
저장한 후에 다시 블로그에서 포스트를 클릭해보면 아래와 같이 저장한 데이터의 포스트가 조회되는 것을 볼 수 있습니다.

다음 번 포스트에서는,
현재 화면 상단의 메뉴버튼이나 홈 버튼 등은 모든 페이지에서 공통으로 보이는데,
각 html마다 하드코딩이 되어있습니다.
이 부분을 좀 더 효율적으로 코딩하기 위한 방법을 익혀보겠습니다.
Reference